
Monday 21 July 2008
My New Recruit is TALENTED!!!
Melissa is my new recruit.. and she is amazing!!! She has a natural talent that is like awesome!!! We had a stamping night this weekend and stayed up till all hours to create some cool stuff... I loved her cards that she came up with for her Christmas in July type workshop... How beautiful are they!!! I asked her if I could take some photos... Just so I can brag!!! and so I can CASE!!! Love How Stampin' Up brings talented crafty people together!!!

More BIG Bye-Bye We Love You Cards
It's always a challenge to decorate the BIG cards.. They are about 50cm by 80cm on the front.. so it takes a lot to decorate!!! It's a bit deceptive when you look at this picture.. but if you look in your catalogue at the level 3 hostess reward stamps (Time Well Spent pg. 23) that I used you will get a better picture of the actual size of it... I coloured in the flowers using my Aqua pens and my water color crayons. Still my favorite medium to use in colouring!!!

I used Kinda Glitz to do the glitter.. just because of the time factor.. I needed to give them away an hour after i finished making them and I wanted them to sparkle!!! Bling is always good!!! but I discovered that if you want to use Crystal Effects and your Dazzling Diamonds you can use the Heat tool to speed up the drying process.. I kind of knew that already.. but you know what I mean when I say I discovered it... It just came to me.. like a revelation.. brilliant!! hehe.... the butterfly's are on velum again.. and the glitz on the vase is using a cake decorating technique.. cant remember the name of it but you see it on marzipan icing wedding cakes and the like... It's just random squiggly lines... cool effect... I think..
This next one I used my Stampin' Spots (pg. 130 & 131, 2008/09 Idea Catalogue).. All I can say is YEAH for the Stampin' Scrub!!! (pg. 149, 2008/09 Idea Catalogue) Especially when you are doing the alternating colours with the lettering... I used the spots for inking the Happiness (pg92) stamp... and for the big letter "U" then I used my Aqua pen to blend the colours in a little... could have done that a bit better but it worked ok... next time I will blend the purple down I think ... see if that works better...

I used the Heat & Stick Powder and the Dazzling Diamonds Glitter to put on the card flower and heart... I also use Kinda Glitz to add a bit of bling to the Happiness stamp...
I think people really love a handmade card... It shows you really do love and care for them... It's a gift from the heart!!!
Saturday 19 July 2008
Stamping on Canvas (September Class)
This is what I am thinking about doing for my September the 13th Canvas workshop... This is my first attempt at canvas stamping.. I think it looks ok.. I woke up at 5am this morning with some ideas going through my mind.. and the stamps that I dreamed about were out on loan.. so I changed my inspiration and just experimented.. with other stamps... I will have a play some more and come up with some more designs..
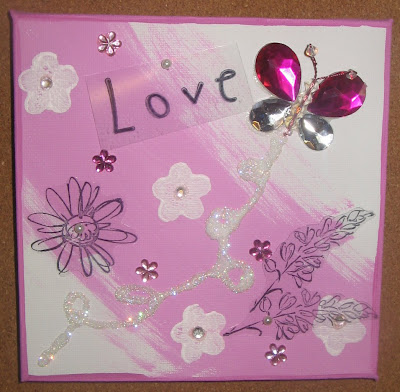
These would make a great inexpensive pressie or dress up a child's room beautifully... With the price of canvas at the bargain shops these days anyone can have the expensive taste of an interior designer .. and do it on a shoe string budget!!

These would make a great inexpensive pressie or dress up a child's room beautifully... With the price of canvas at the bargain shops these days anyone can have the expensive taste of an interior designer .. and do it on a shoe string budget!!
Christmas in July 2008
 This weekend I had my Christmas in July workshop.. It was a great success... everyone that came loved it and was keen to do more.. they were even talking about getting together to make boxes to match each of the 10 cards that we made so that they could give 10 people from work lovely little boxes with matching cards and something inside like chockies... I though it was great idea... and would make for a very impressive inexpensive gift!!
This was the box we made
 And here is the 10 cards....
Colour Organisation

I purchased the Color Caddy a few months ago.. I was so excited.. You so know that you are addicted when you get excited about getting all the colours in the rage!!! Now because I forget which colour is in what range... and I forget the names as well most of the time... well I cut up last years catalogue and laminated the colour range swatches from the back of the catalogue... and glued them on the side of the Caddy... It is so awesome in helping me remember where they go.. now I have them sorted out all the time...
The other thing I did just recently was bought a whole lot of filing storage containers to organise my card stock... I used the same sort of idea as the Color Caddy in cutting up last years colour swatches.. but this time I wanted them to go across.. so I used the ones in the frot of the catalogue... I laminated them and stuck them on with sticky tape... I put 3 colours in each file which worked out perfectly as the colours are in sets of 3... How easy does that make things now??? Oh I LOVE organisation!!! It is such a great thing...

Flutter Bye's

I made another good-bye card... With this one I wanted an Oriental look.. with the red black and white.... I wasn't really sure what I was going to do after that though.. all I knew was I wanted some butterfly's to look like they were flying away...
I stamped the butterfly's onto the black card stock with Whisper White ink and then with Stayz-on ink on some Vellum... to make them look like they were standing up I cut a small strip of dimensionals and stuck it to the center of the butterfly then bent up each wing so they were standing quite high... I got stuck at this point... so I left it for a couple of days... and when I came back to it I knew what to do to finish it off.. in a way that I would be happy with..
I water coloured the flowers using a rose red ink pad and squeezing the center of it when it was closed to get ink on the lid and picked up the ink with my Aqua painter.
Subscribe to:
Posts (Atom)